


Before

 **photo credit for “before” shots from agent listing
This post contains affiliate links.
There are few things more delightful or interesting to me than happening on a blog post detailing all the info and shortcuts of a project that I’d like to tackle, so if you are looking to remodel part or all of your kitchen one day and you would like to read a lot of technical “Beautiful Mind” (like the Russel Crowe movie) thinking, please join me in our remodel. Oh, and book your therapist now bc I hear it can read havvov on relationships. Oh, but not ours. Ours is perfect and amazing and all that. Ha! OK…
**At the end of this post will be links to many items in our kitchen**
I’m sharing the photos I used in a feature with XO Mrs. Measom HERE. I love sharing information and I am bad about responding to individual Instagram comments due to time! I am the thousandth person who asks a blogger what white paint she used in her gorgeous living room, so I get it! lol
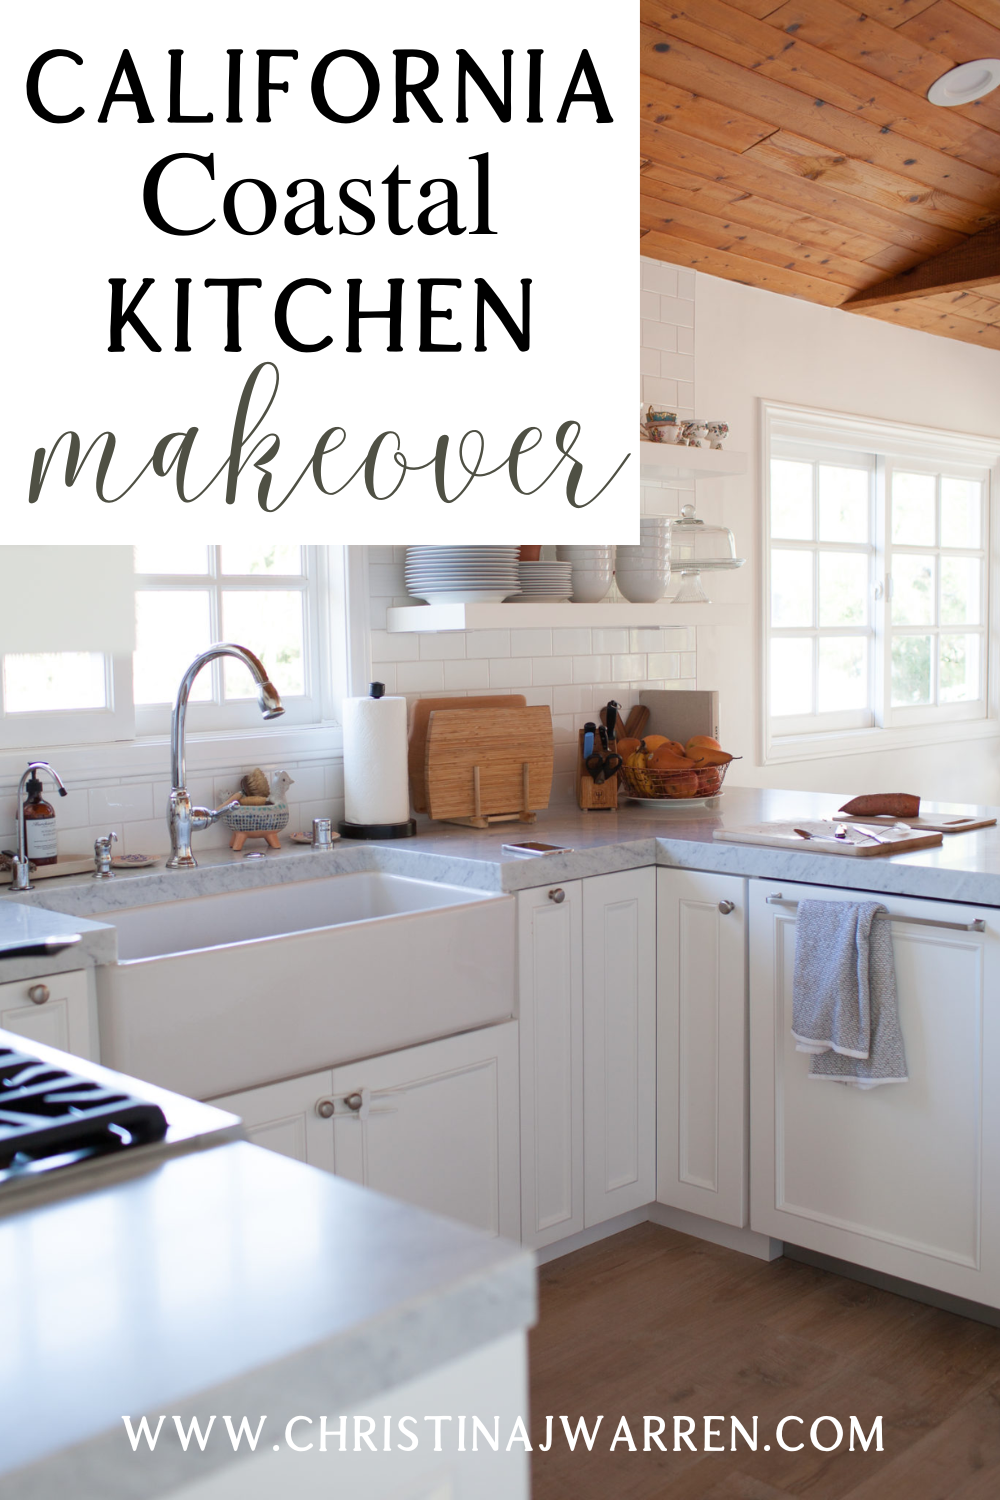
When we bought this house, the kitchen was probably about 30 years old. I hoped to be modest and keep the cabinet boxes, replacing the doors and popping in a new countertop. Unfortunately, upon closer inspection after we closed, they were all in pretty bad shape. It seemed like such great craftsmanship in the building of the home but the finishes of the kitchen and bathrooms were very basic and had not worn well over the decades. Luckily, things like the stairs, wainscoting, built ins and ceilings were well done and looked wonderful.
There are multple ways to go about remodeling a kitchen. This was our approach.
We met with three kitchen contractors who we found on YELP. If you can get the info of someone’s contractor who has done recent work on a home you’ve seen in person, that would be my first suggestion but we did not have that available at the time. OK..
**photo credit for “before” shots from agent listing
This post contains affiliate links.
There are few things more delightful or interesting to me than happening on a blog post detailing all the info and shortcuts of a project that I’d like to tackle, so if you are looking to remodel part or all of your kitchen one day and you would like to read a lot of technical “Beautiful Mind” (like the Russel Crowe movie) thinking, please join me in our remodel. Oh, and book your therapist now bc I hear it can read havvov on relationships. Oh, but not ours. Ours is perfect and amazing and all that. Ha! OK…
**At the end of this post will be links to many items in our kitchen**
I’m sharing the photos I used in a feature with XO Mrs. Measom HERE. I love sharing information and I am bad about responding to individual Instagram comments due to time! I am the thousandth person who asks a blogger what white paint she used in her gorgeous living room, so I get it! lol
When we bought this house, the kitchen was probably about 30 years old. I hoped to be modest and keep the cabinet boxes, replacing the doors and popping in a new countertop. Unfortunately, upon closer inspection after we closed, they were all in pretty bad shape. It seemed like such great craftsmanship in the building of the home but the finishes of the kitchen and bathrooms were very basic and had not worn well over the decades. Luckily, things like the stairs, wainscoting, built ins and ceilings were well done and looked wonderful.
There are multple ways to go about remodeling a kitchen. This was our approach.
We met with three kitchen contractors who we found on YELP. If you can get the info of someone’s contractor who has done recent work on a home you’ve seen in person, that would be my first suggestion but we did not have that available at the time. OK..
- Independent person. Puts in full Ikea cabinets. He was rated as an excellent planner and installer. We had Ikea cabinets in our last place (rental) and those were about 10 years old and the cabinets had some cracking, fading and peeling (nothing a little VSCO filter can’t hide, eh?) OH! Recently I’ve heard of companies who will do more quality cabinet faces/doors but you use the Ikea builtin boxes.
- Family owned, cabinet company with staff (dry wallers, countertop people etc). Known for quality work and craftsmanship. Made it clear to us that they were not known for speed.
- More of a designer person who also has a staff. Pre made cabinets at different price points. This woman had opinions on style where as #2 did not have many suggestions and when they did suggest, often it was not our style. She is fast/on time. The cabinet quality even at the highest price point was unimpressive (parts seemed cheap/jiggled). Her idea to do an inset cabinet/appleince garage along the long wall of cabinets to break up the “box” was awesome and we did borrow it. Thank you!
Cost
The estimate our contractor gave us did not include all the work that had to be done for a complete kitchen makeover. For example, the price included: demolition, cabinetry, installation, drywall, but NOT things like: fixtures, faucets, all plumbing, tile backsplash, electrical work or appliances.
It was nice to have a general contractor to coordinate the steps and schedule them but often it was Chris or me pushing the next step along. Probably a regular thing when working with a contractor who has many jobs going on.
Once we signed with our contractor, he came out to do multiple measuring sessions for our cabinets and created basic computer renderings so we could see what it would look like finished. We made our changes and signed off on it.Demolition
This phase is glorious. It’s fast! The area is gutted just like in Fixer Upper and you see your dreams before you! Well, there are many many steps to come! Use this time to pick out your finishes and details.
Electrical
We had the can lights in the ceiling converted to cooler, safer, low energy LED lights and put them on a dimmer (I am addicted to dimmers and want them on every light). The contractor likes to hide electrical outlets underneath cabinets in outlet strips so that was fine with us. The only thing is that you can see my black wire for the toaster oven I always have plugged in on the counter. Otherwise its pretty great/unnoticeable.
Maybe if i hand’t just had our second baby, I would have been more involved at the time of electrical planning because I would have liked a light fixture over the sink. Oh well. Remodel woahs. 🙂
Paint
Chris primed the drywall and we chose a pure “out of the can” white paint in a “velvet” finish otherwise known as “eggshell” depending upon brand. The color is crisp, has zero undertones. The finish makes it easily wipable and it reflects light without being shiny. With the pure white cabinets and cool tones of the marble, we wanted a cool toned wall.
We considered some very light, cool grays but man oh man its hard to commit to anything that isn’t “basic” when time and money are at stake! Also, we were not ready to paint our wooden ceilings white so that funky orangey brown color had to mesh with all of this too. Don’t get me wrong, we enjoy the wooden ceilings and if I was a paid designer for someone else’s home, I’d probably say, “Paint that ceiling white this minute!” But i’m just me and I feel it would be a calamity to do something un-doable to that natural wood (please do not remind me of this in a few months when I am painting said ceilings white.
Cabinets
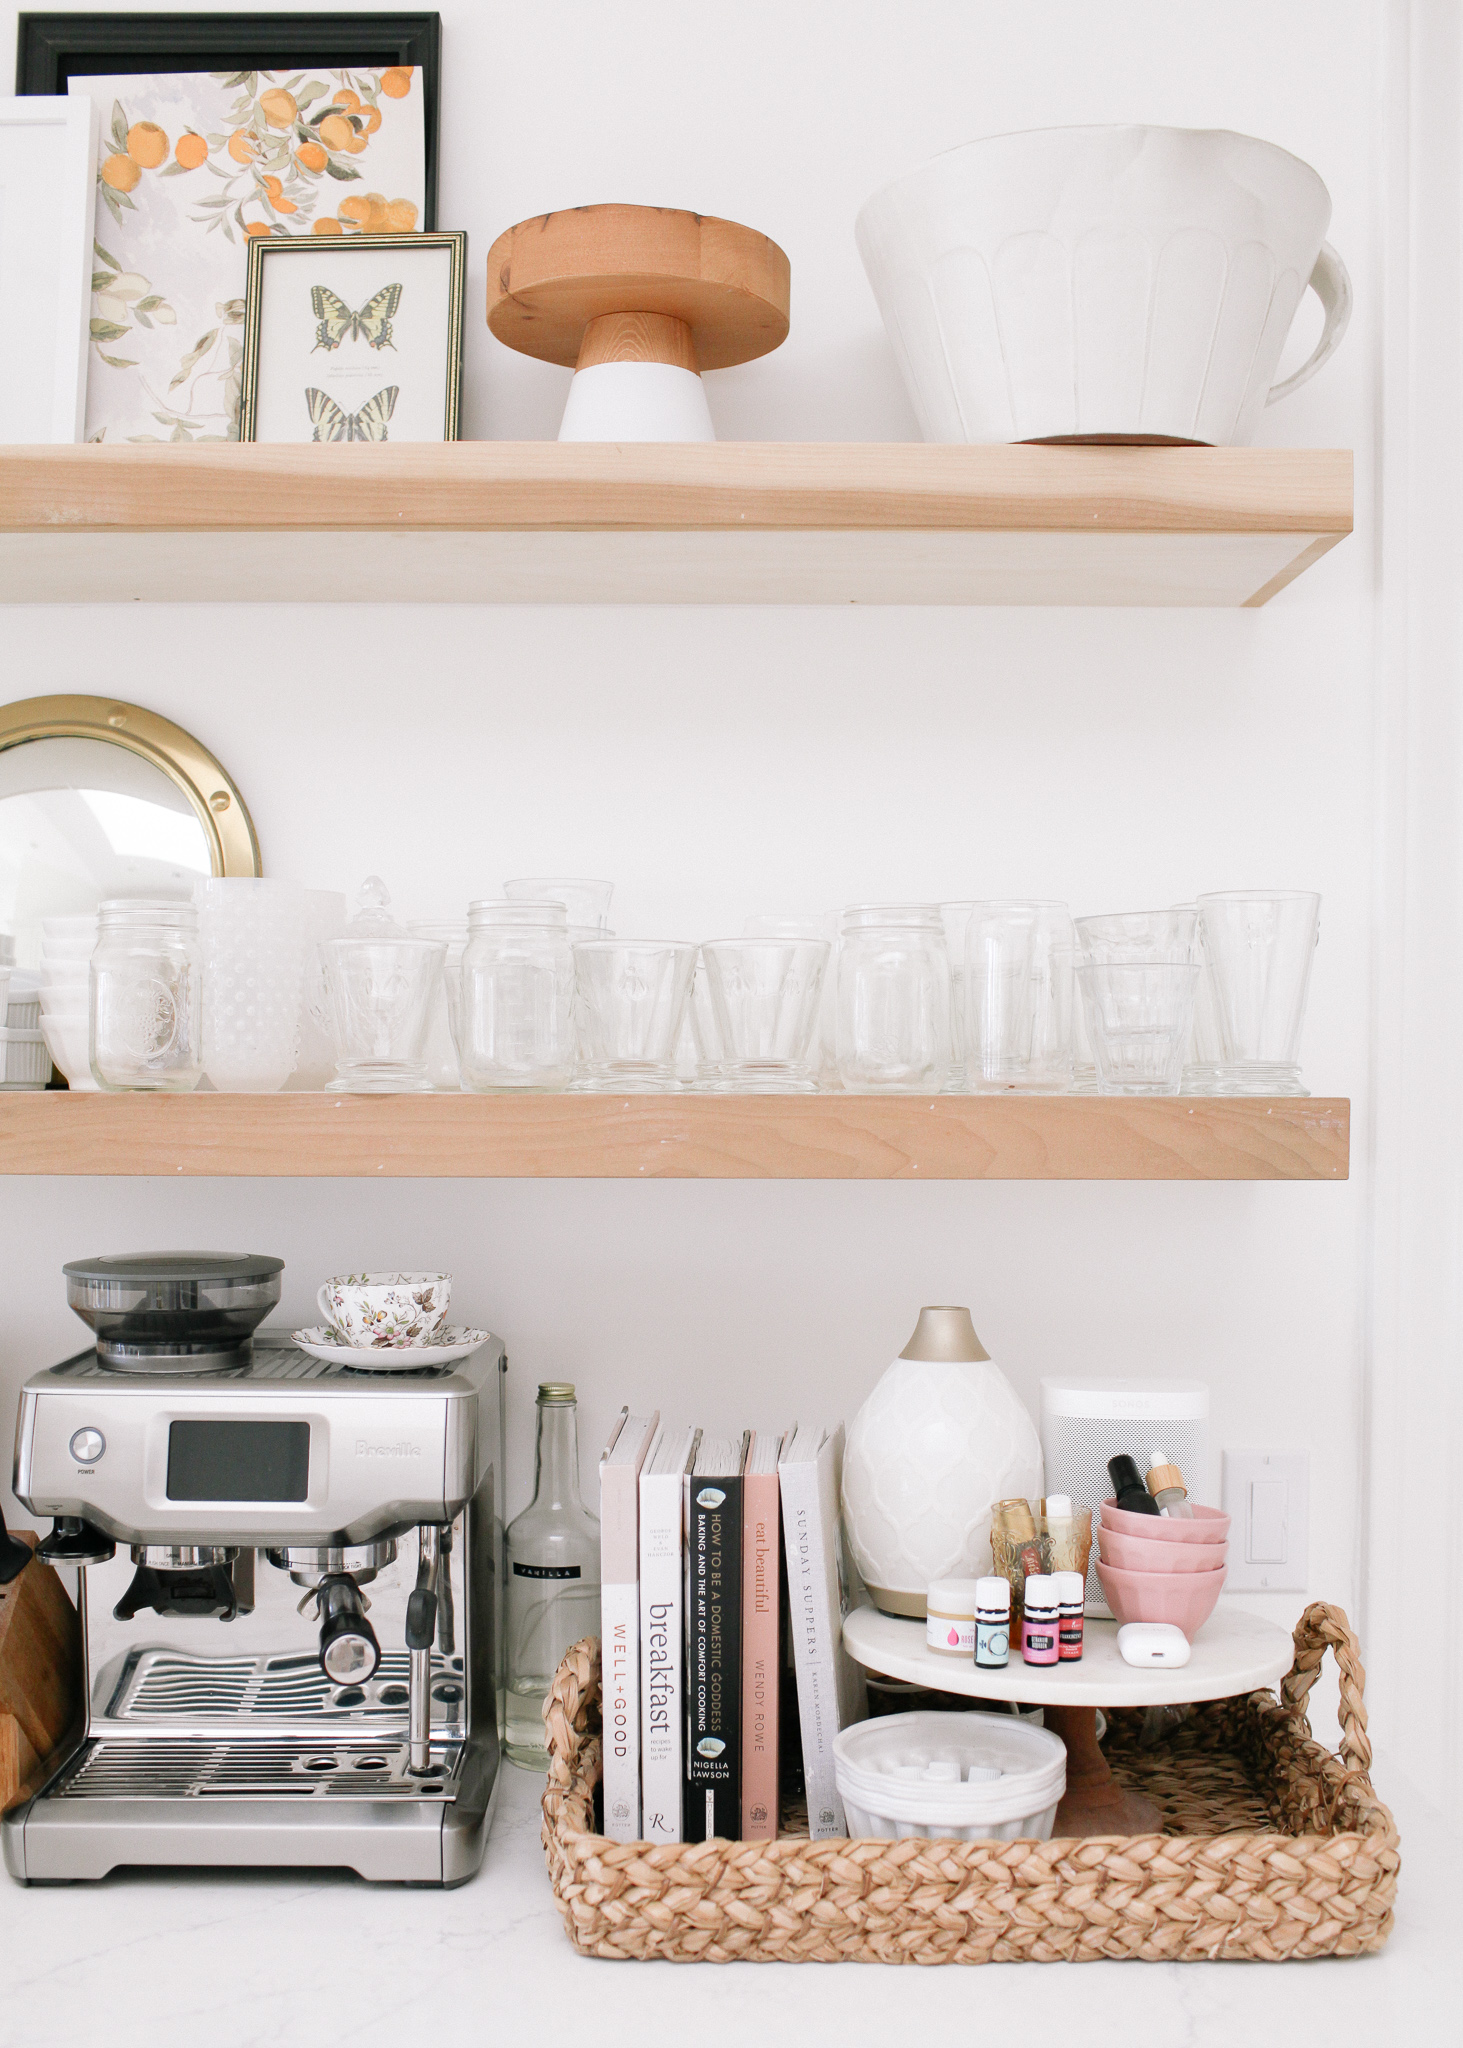
The cabinets are super sturdy and well made. So the quality for us was worth the wait. We chose a shaker type style with a bit of extra detail so it would look “transitional” which is like trying to update a traditonal home. The contractor had a bunch of cabinet doors in different styles and colors for us to choose from. I highly recommend trying out the cabinet colors in your actual kitchen. We brought the samples to see how the different whites looked in our space. We selected a pure straight white with no undertones because the light our kitchen gets can really play up any undertones. We were nervous about this wondering if it would turn out cold and modern looking but it turned out great. I searched the web for checklists to make sure I had a space/drawer/cabinet planned for everything I needed (pans, pots, baking, utensils near the stove etc). Contractors are amazing but no one is perfect and once its done its so expensive to change. Most of the cabinets are soft close. The corer cabinets by the sink are super thick and sturdy double lazy suzans. The pantry has 2 pull out drawers. The appliance garage has outlets in the back so thats where the blender and coffee maker, mugs and water bottles hang out. We had a piece of marble countertop cut for that area too.Floating Shelves
We decided on floating shelves for this area to open the space up and for easy access to daily dishware. There are steel beams attached to the beams in the wall the ensure they can handle a lot of weight. There are electrical outlets underneath the bottom shelf.
As for lining it up, i didn’t want it lined up with the edge of the countertop below. It is equidistant to the window as the cabinet to the left of the window and it falls a bit short of the countertop below. The contractor selected the thickness and I think the thickness was for fitting in the steel support beams.
Countertop
We chose honed Cararra marble countertops. Many contractors will advise against this. BECAUSE: marble is very porous and it etches and can stain. Please read as many articles on this type of thing before you make your final decision. I did and it gave me the confidence to do it. I also talked to Miko Bowen (sweetest lady) who has a beautiful kitchen with this marble and she answered many of my questions.
Also, when it came time to make the purchase of our slabs, I could not bear to buy anything else. I searched so many alternatives that looked similar to marble but as I read somewhere, “The heart wants what the heart wants!”
My opinion on honed (the NOT shiny kind, its like a matte surface) Cararra marble: I LOVE IT. Nothing is more beautiful. It etches which looks like a water spot or cup ring on the surface in some spots in certain lights. When I go to my favorite cafe who has the same counter top, I see all the etches when I examine it but as I enjoy the space like a normal human, I see the beautiful, elegant, timeless look of marble. I have not had any stains. This is due to an excellent sealing job by the stone installers and care with certain foods.
At first, each etch made my eyeballs hurt but after about 6 months of lowering my blood pressure, I’ve learned to enjoy the “patina.” the marks slightly fade and really as you enjoy your kitchen visually as a normal human, you do not see them. When I do, I get that feeling of my well, lived in cafe and that’s the vibe I want with my house. Oh, but if I see you hovering with your orange juice, I’ll slide a coaster under it so fast, I could start a fire. HA!
As for how thick. Well, our cabinets were beefy, built up to the ceiling so I felt they could handle a thick countertop to balance them out. FYI all slabs pretty much come in the same thickness. These counters look super thick because they cut a piece and glue it to the edge for the appearance of thickness. We also liked the kind of modern look of it.
I also love the slab thickness size and the mitered edge detail look. Just wanted you to know to consider your options.
There is some overhang for seating and the counter height is kind of high. If you want, I can measure and put it in here. The high counters are nice for having more cabinet space below and easy work hight above.
Where to BUY Accessoreis
This is painful to re-live…I bought most of the appliances, sink and plumbing from Pacific Sales (Owned by Best Buy/national chain). Good things about this place: almost always 40% sale on stuff, limited/curated selection reduces choice overwhelm, sales people are very knowledgable.
Things that are the opposite of good here: SLOW, disorganized. After waiting weeks for a backordered item and being called to come pick it up, I get there, wait in line and find out its not there. Where did it go? Doesn’t matter, two more weeks and another trip. Saw other people going to same thing every other time I’m there. lol
ONLIne shopping is awesome but theres nothing like feeling the quality of an item, seeing the finishes in person etc. Again, I think the best thing to do is to ask a friend/blogger etc exactly what they used and just go for it! Too many choices make my hair gray! ha!
Sink
Shaw’s Rohl white apron farm house sink. We got the large one. I have the grate in it and use it to protect the bottom from scratches/chips but more so for use as a drying rack within the sink. It’s rad.
Plumbing
Newport Brass is quality. I like the weight of it. The styles we chose are transitional. We went with polished chrome. I feel like a sink looks most natural/clean with a shiny finish. The main faucet has a pull down sprayer head. I really feel some form of a sprayer is needed for these big sinks to wash them down at the end of a sesh. We chose the coordinating, soap pump (with spinning white porcelain “soap”), cold water dispnser (for filtered water), air gap (dishwater overflow thing), and disposal button. So that’s 5 holes cut in the countertop.
remember to buy a garbage disposal. I found a good one at Lowe’s. You may also need to purchase a drain for your sink.
Fixtures
We chose solid brass cabinet and drawer pulls in brushed nickel from Rejuvenation. I had a coupon and they shipped fast. At first I ordered all black (oil rubbed bronze) parts but they seemed to take all the attention when I tried them out in the room. So, I swapped them for the brushed nickel which I had avoided before because I thought that finish was boring when in fact I liked how it blended into the kitchen and didn’t draw attention.
The mix of knobs and pulls was what we decided upon. The knobs are 1 and 1/4″ the pulls are 3″.
Rejuenation also had a great price on there super large appliance sized pulls we got for the fridge, freezer and dishwasher (1/3 or less the price compared to other places). I think 18″ is the size you want for appliances if you need them.
The ONLY thing here was that they were out of the drawer pulls I wanted so I chose ones that were similar but a bit “sharper” in shape. Not a huge negative but I would have preferred the smoother/less angular pulls. They had them back in stock recently and I got them for our bathroom. Yay!
Appliances
Some companies offer bundle packages. We got a free dishwasher when we bought the fridge, cooktop, oven and microwave. I didn’t think too hard on this aspect other than quality.
Backsplash
I even told my IG friend, Patti (amazing remodel/restorer) that I wasn’t going to do a subway tile backsplash. We planned to do a lip around the back in the same honed Cararra marble but the way some obstacles came up, it wouldn’t work here. But you know what works really well a lot of the time??? I love how the tile turned out.
We used 3 X 6 inch H-line Cotton subway tile from Arizona Tile. The edges of the backsplash area are finished in a pencil tile by the same company.
We chose white, sand grout with 1/8 spacing.
Well, that’s what comes to mind now! Please let me know if you have any other questions and I’ll let you know as well as add it to the post! Good luck and send me any photos of your remodel stuff. Love it!Shop Our Kitchen
These will also be available in the “shop” dropdown menu in “shop our kitchen” at the top of the site where I’ll add things as they come up. 🙂 I hope you’ll follow along as I continue to style this space and make it our home. Thank you. Select the arrows to scroll all the items.


Leave a Reply
You must be logged in to post a comment.